04. Dev Environment Setup
Create React Native App
When we build our app throughout this course, we'll be building it for both Android and iOS. One of the puzzles at hand is that we'll need to support two separate development environments: iOS uses Xcode, and Android uses Android Studio. This introduces a lot of complexity into this course; after all, both Xcode and Android Studio could probably each be their own set of courses!
Luckily for us, there's a new tool we can use that will allow us to develop for both Android and iOS without ever opening up Android Studio or Xcode. It's called, not surprisingly, Create React Native App. It's similar to Create React App in that all you have to do is install the CLI via NPM. Then, via the CLI, you can easily scaffold a brand new React Native project.
Just like Create React App, there are pros and cons to using Create React Native App (CRNA). First, the pros.
Create React Native App Pros
The obvious one is that Create React Native app minimizes the amount of time it takes to create a "hello world" application. The fact that you can run a command in your terminal and 15 seconds later have a project that run on both Android and iOS using JavaScript is pretty incredible. Next, and we'll look deeper into this one later on, Create React Native App allows you to easily develop on your own device. This way, any changes you make in your text editor will instantly show on the app running on your local phone. Next, and this is something I mentioned earlier, with Create React Native App you just need one build tool. You don't have to worry about Xcode or Android Studio. Lastly, there's no lock in. Just like Create React App, you can "eject" at anytime.
Create React Native Cons
Now, there are some cons, and granted they're pretty minor, but they're good to be aware of. First, if you're building an app that's going to be added to an existing native iOS or Android application, Create React Native App won't work. Second, if you need to build your own bridge between React Native and some native API that Create React Native App doesn't expose (which is pretty rare), Create React Native App won't work.
Let's jump right in!
Install Create React Native App
In order to use Create React Native App, go ahead and install it once globally:
npm install -g create-react-native-appAlternatively, feel free to use yarn as well (visit here for setup instructions):
yarn global add create-react-native-appNote that Create React Native App uses Expo CLI under the hood. You can get up and running with React Native using the instructions on this page, but feel free to visit the React Native Quick Start guide if you prefer to use "vanilla" Expo CLI as an alternative.
⚠️ Using Yarn ⚠️
Create React Native App does not currently work well with NPM v5, due to bugs in NPM. While there should be no issues with NPM v3 or v4, we'll be using yarn from here on out just to be safe.
Expo
Why Expo?
Expo is a service that makes just about everything involving React Native a whole lot easier. The idea behind Expo is that there's no need to use Android Studio or Xcode. What's more: it even allows us to develop for iOS with Windows (or even Linux)!
With Expo, you can load and run projects built by Create React Native App with the same JavaScript you already know. There's no need to compile any native code. And much like Create React App, using Expo with Create React Native App lets us get an application up and running with almost no configuration.
We'll be relying on Expo heavily in this course. First things first: you need to install Expo. Head to the app store and install the Expo mobile app for your device:
- Expo on Google Play (Android)
- Expo on the App Store (iOS)
SOLUTION:
- Expo is a set of tools and services that allow us to build native (iOS and Android) applications with JavaScript
- Much like Create React App, Create React Native App allows us to quickly build and scaffold a starter application
- Expo makes it easy to build mobile applications without having to write native code (e.g. Swift, Objective C, Java)
We'll soon learn how to install the iOS and Android simulators. If you're planning to run your React Native projects on your physical device, you don't need to do this step.
The set up for the Android simulator can be quite complicated. Moreover, Expo can be unreliable at times. Don't get discouraged! Try using an Expo Snack🍎 to build the class project and the course project if you're having trouble setting up your local environment.
Simulators 📱
Expo together with Create React Native App is the fastest way to get up and running, but there are also other ways to start building your projects, as well. If you're looking to integrate React Native into an existing app, or if you've ejected your app from Create React Native App, feel free to follow the Building Projects with Native Code tab from the React Native docs. The guide also sets up iOS and Android simulators, allowing you to view your mobile apps right on your machine!
We'll be utilizing both iOS and Android simulators in the interest of demoing projects in this course, but they are completely optional in getting started.
Installing Simulators
🔷 iPhone Simulator 🔷
iOS apps can only be developed on a Mac unless you have a virtual machine set up on your machine. To set up the iPhone simulator on your Mac, follow these instructions:
1) Go to the App Store.
2) Download Xcode.
3) Follow the installation instructions.
4) Open Xcode and install additional software if prompted to do so.
If you already have Xcode installed, please make sure that you update it. Then, open it to make sure no further updates are needed. Most problems with setting up your React Native development environment can be solved this way.
5) Open Xcode and go to "Preferences."
6) Go to the "Locations" panel and select the most recent version in the "Command Line Tools" drop-down list.
7) That’s it!
🔷Android Simulator 🔷
The setup is kind of complicated, but we'll get through it together.
Part 1
1) Install a recent version of the Java SE Development Kit(JDK).
2) Install Android Studio
Choose a "Custom" setup when prompted. Make sure the boxes next to all of the following are checked:
Android SDK
Android SDK Platform
Performance (Intel ® HAXM)
Android Virtual Device
3) Click "Next".
4) Launch Android Studio.
5) Click on "Configure" and select "SDK Manager".
6) Select the "SDK Platforms" tab.
7) Put a checkmark next to "Android API 28", "Android 8.0", "Android 6.0 (Marshmallow)," "Android 7.0," and "Android 7.1.1."
8) Go to the "SDK Tools" tab.
9) Put checkmarks next to :
- Android SDK Build-Tools
- Android SDK Platform-Tools
- Android SDK Tools
- Android Emulator
- Intel x86 Emulator Accelerator (HAXM installer)
- Under the Support Repository, put a checkmark at "Android Support Repository"
10) Click "OK".
11) Follow the on-screen directions to install the requested components.
12) If you are on a Windows machine, please install the Intel x86 Emulator Accelerator through the Android SDK Manager, if prompted.
13) If you are on a Windows or Linux machine, please make sure to enable Virtualization Technology in your BIOS settings.
14) If you are on a Windows machine:
a) Open Android Studio. Go to "File" and then click "Project Structure." Make sure this box is checked: "Use embedded JDK(recommended)." Please copy the Android SDK location (e.g. C:\User\userName\AppData\Local\Android\Sdk); we'll be using it shortly.
b) Open the System Control Panel. Click on "Advanced system settings." Click on "Environment Variables." Create a new variable ANDROID_HOME and set it to the Android SDK location you copied before.
Create a new variable JAVA_HOME and set it to the installation path for the Java Development Kit (e.g. C:\Program Files\Java\jdk1.8.0_171).
15) If you are on a macOS or Linux:
a) Open Android Studio. Click on "Configure" and select "SDK Manager" again. Go to Appearance & Behavior -> System Settings -> Android SDK.
b) Look at the path that’s filled in for the "Android SDK Location" section. It should be something like: /Users/yourName/Library/Android/sdk. If you are on macOS or Linux, add the Android SDK location to your PATH using ~/.bash_profile or ~/.bash_rc (e.g. echo 'export PATH=$PATH:~/Library/Android/sdk/'>>~/.bash_profile).
c) On macOS, you will also need to add platform-tools to your ~/.bash_profile or ~/.bash_rc (e.g. echo 'export PATH=$PATH:~/Library/Android/sdk/platform-tools' >>~/.bash_profile, source ~/.bash_profile).
d) Make sure that you can run adb from your terminal.
Part 2
You have a choice of either using the Android Studio Emulator or Genymotion as your simulator. You don't have to install both.
Directions for Setting up the Android Studio Emulator
1) Open Android Studio.
2) Click "Start a new Android Studio project". You don't need to change any of the settings; just click through to "Finish". Click "Finish".
3) Once a new project is created, look at the messages inside the Gradle Console.

If you see any error messages that prompt you to install additional software, please install it.
4) Select "Tools" --> "AVD Manager". Ensure that there's a checkmark next to "Enable ADB Integration".
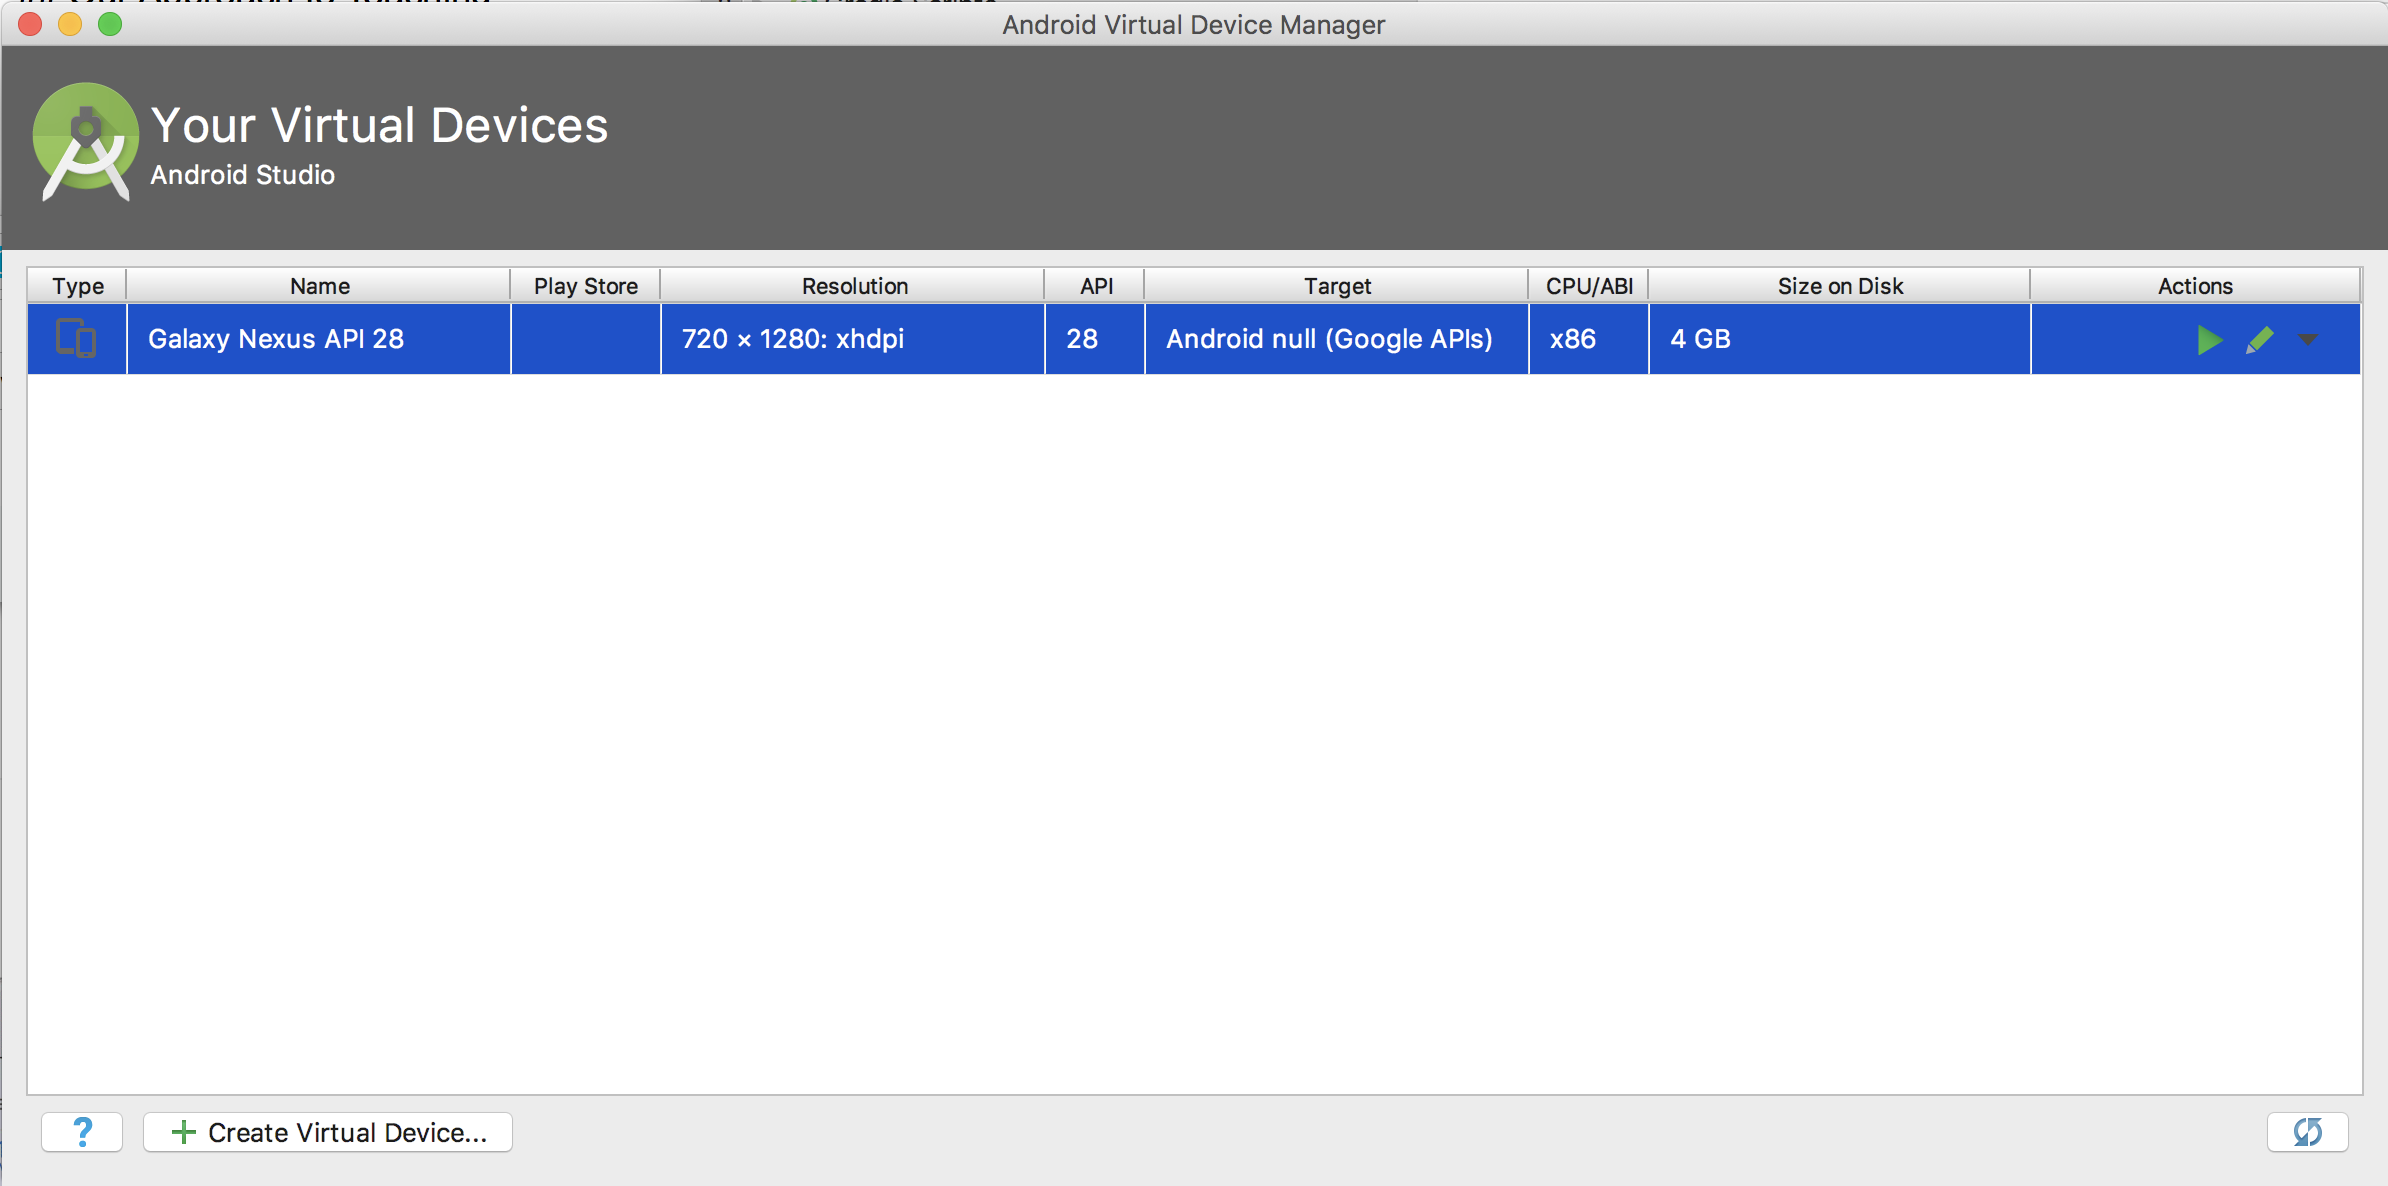
5) Click "Create Virtual Device".
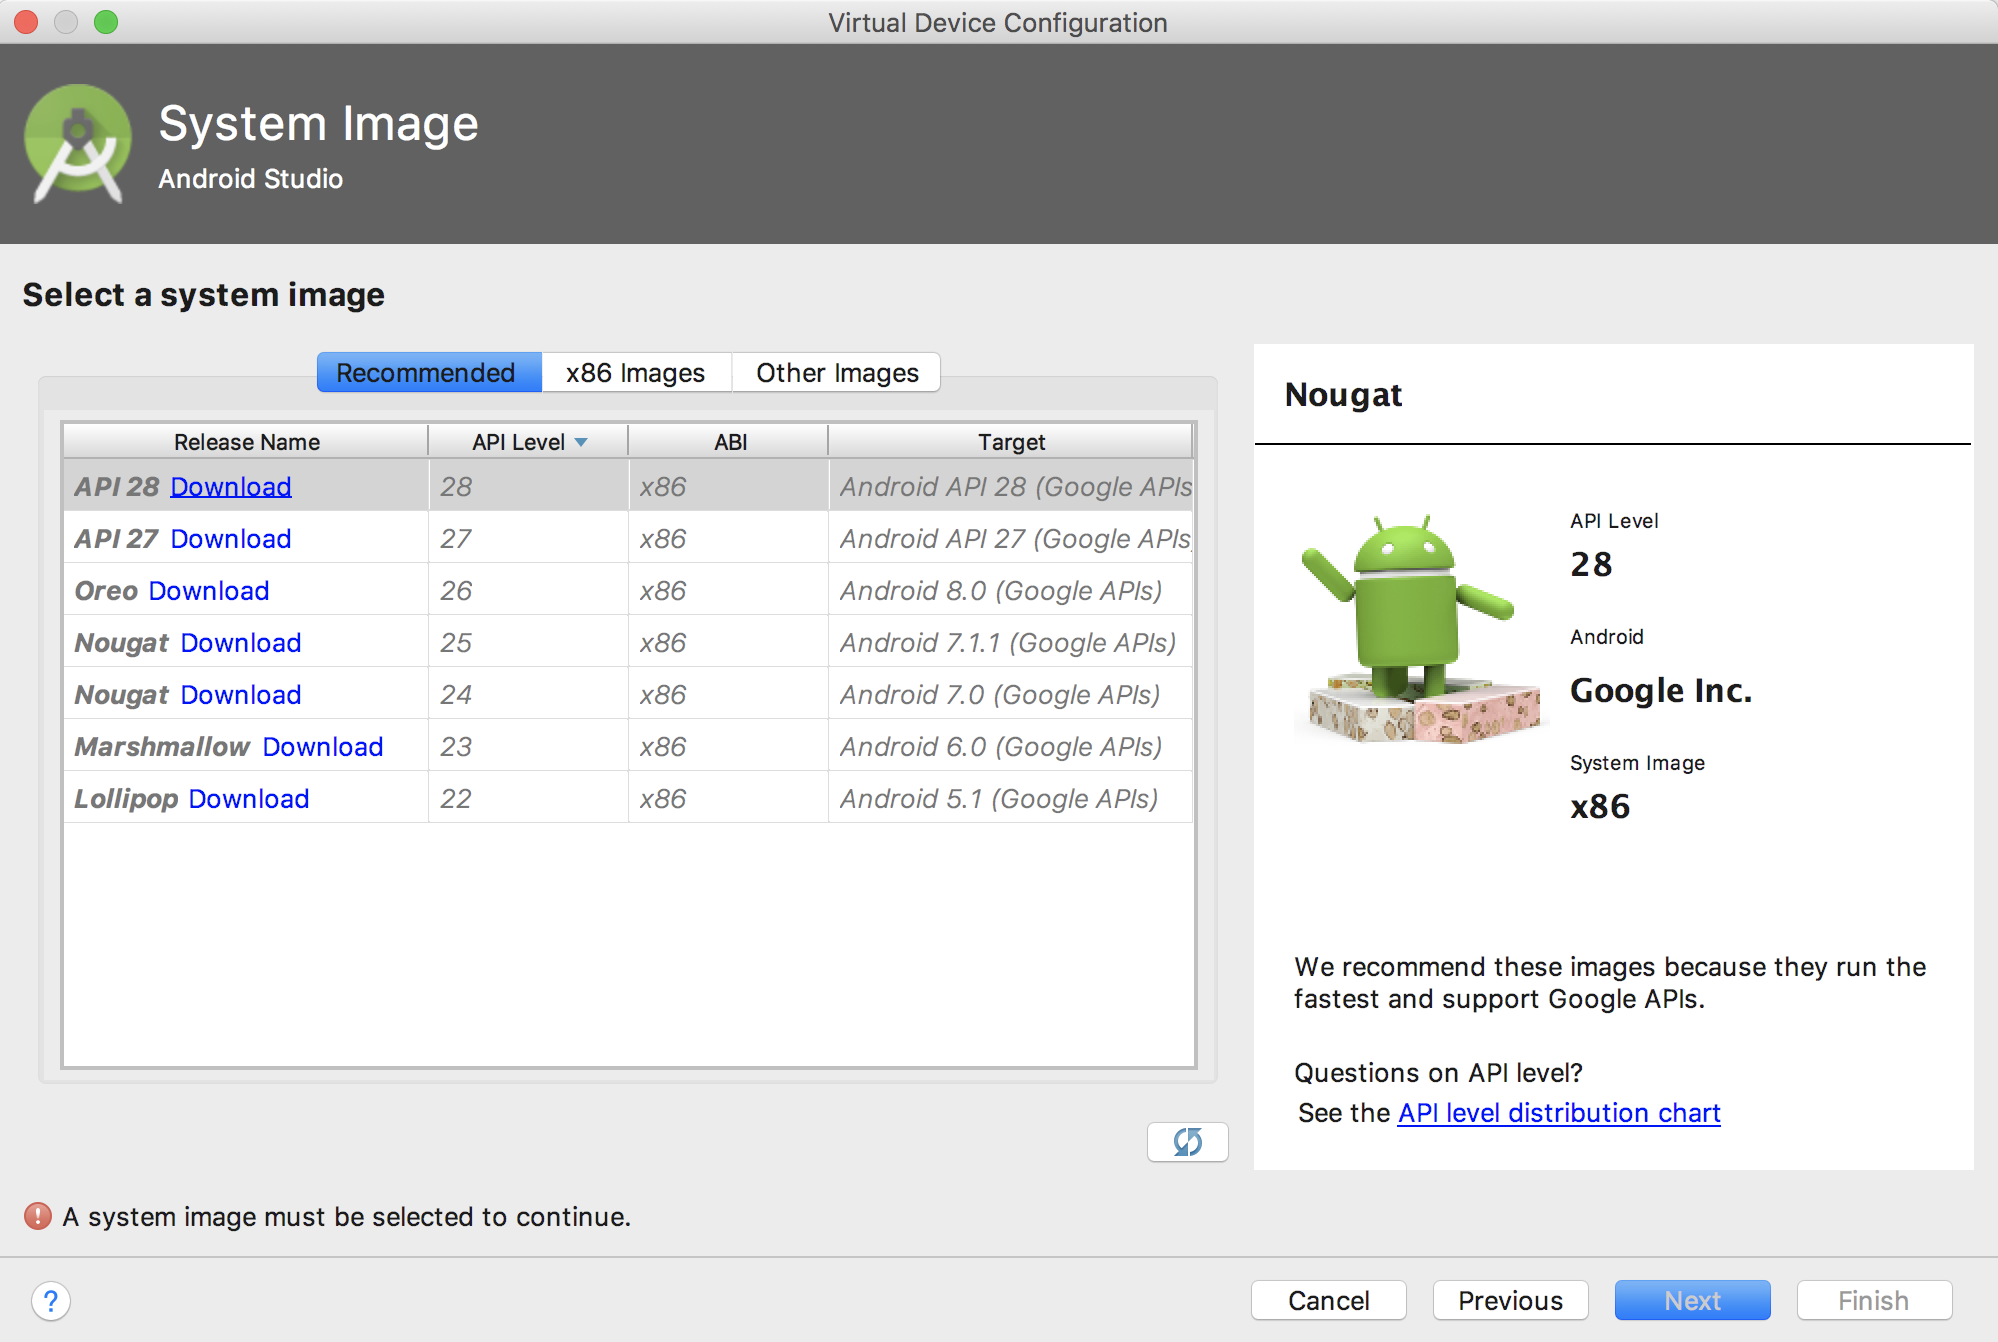
6) Select the system image you want and click "Download".

7) Once the download completes, click "Next" and "Finish".
8) Click the play button.

Directions for Setting up Genymotion
- Download and install Genymotion(it is free for personal use).
- Set up an Android emulator by selecting the type of phone you want to emulate and wait for the setup to complete.
- Open Genymotion and navigate to "Settings" and then "ADB". Select "Use custom Android SDK tools," and update it with your Android SDK location (e.g.
/Users/yourName/Library/Android/sdk). - Restart GenyMotion.
- Got to "Settings". Go to "ADB" and make sure there is a checkmark next to "Android SDK successfully found".
- Run
npm install -g expto installexpglobally. - Run
exp path. This will save yourPATHenvironment variable so that XDE knows where to find your Android tools. - Close Android Studio if you still have it open. Check to make sure that Android Studio is no longer running.
- Start the GenyMotion Emulator by clicking "Start".
The majority of these instructions are from the Genymotion documentation.
💡 Bundling Error (Unexpected Token)💡
If you're seeing bundling errors while attempting to run a simulator, try changing your Babel preset for React Native to version
2.1.0. Then, remove yournode-modulesdirectory, reinstall withnpm install, and run the simulator again. For more information, check out this post on Stack Overflow.💡 Error: Cannot Connect to Daemon💡
If you see this message "Couldn't start project on Android: could not install *smartsocket* listener: cannot bind to 127.0.0.1:5037: Only one usage of each socket address (protocol/network address/port) is normally permitted. Could not read ok from ADB Server. Failed to start daemon. Error: cannot connect to daemon," please restart your computer and try again.
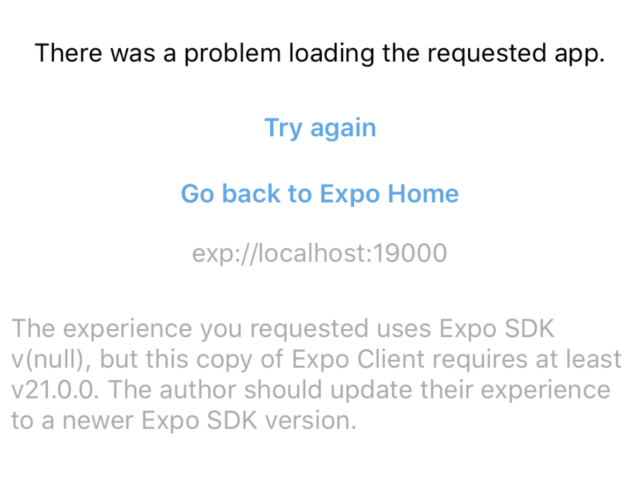
If you're trying to run your project on the iOS simulator and are getting the error message below, please go to the App Store and update your Xcode. Then, open Xcode and install additional required software, if prompted. Open your project's app.json file and edit the value of sdkVersion to match the required version listed in the error message (e.g. 21.0.0). Then, run rm -rf .node_modules && yarn install && yarn run ios --reset-cache.

HelloWorld
⚠️Expo CLI 2.0 ⚠️
If you created your app using
create-react-native-app, you may have noticed a graphical UI running in your web browser as well as slightly different information in your terminal. Expo CLI 2.0 powers the latest version of Create React Native App by default. Most of the information in the terminal remains the same, but to start the project, the directions advise to runexpo startinstead ofnpm start. If you download or clone the in-class project, you'll see exactly the same information in the terminal as is shown in the videos.
The Environment
When creating an app with Create React Native App, what type of support should you expect?
- ES5 and ES6 support
- Object Spread Operator
- Asynchronous functions
- JSX (this is React, after all!)
- Flow
- Fetch
Since we are using purely JavaScript to build mobile apps, this list should come as no surprise! Since Create React Native App ships with Babel, feel free to check out the full list of supported transformations.
Before we start actually building our app, there are some files that are necessary for the project, but aren’t necessary for you to fully understand. Because of this, we’ll just give you the code and you can look over it if you’d like.
All three of these files will live inside of a utils folder. So first, create a folder called utils at the root of your project.
Next, you’re going to create three files inside of your utils folder.
colors.jshelpers.js_calendar.js(make sure to include the underscore!)
Paste the following code into your utils/colors.js file
// utils/colors.js

export const purple = '#292477'
export const gray = '#757575'
export const white = '#fff'
export const red = '#b71845'
export const orange = '#f26f28'
export const blue = '#4e4cb8'
export const lightPurp = '#7c53c3'
export const pink = '#b93fb3'
Next, paste the following code into utils/helpers.js
// utils/helpers.js

export function isBetween (num, x, y) {
  if (num >= x && num <= y) {
    return true
  }

  return false
}

export function calculateDirection (heading) {
  let direction = ''

  if (isBetween(heading, 0, 22.5)) {
    direction = 'North'
  } else if (isBetween(heading, 22.5, 67.5)) {
    direction = 'North East'
  } else if (isBetween(heading, 67.5, 112.5)) {
    direction = 'East'
  } else if (isBetween(heading, 112.5, 157.5)) {
    direction = 'South East'
  } else if (isBetween(heading, 157.5, 202.5)) {
    direction = 'South'
  } else if (isBetween(heading, 202.5, 247.5)) {
    direction = 'South West'
  } else if (isBetween(heading, 247.5, 292.5)) {
    direction = 'West'
  } else if (isBetween(heading, 292.5, 337.5)) {
    direction = 'North West'
  } else if (isBetween(heading, 337.5, 360)) {
    direction = 'North'
  } else {
    direction = 'Calculating'
  }

  return direction
}

export function timeToString (time = Date.now()) {
  const date = new Date(time)
  const todayUTC = new Date(Date.UTC(date.getFullYear(), date.getMonth(), date.getDate()))
  return todayUTC.toISOString().split('T')[0]
}
Finally, paste the following code inside of your utils/_calendar.js file.
// utils/_calendar.js

import { AsyncStorage } from 'react-native'
import { getMetricMetaInfo, timeToString } from './helpers'

export const CALENDAR_STORAGE_KEY = 'UdaciFitness:calendar'

function getRandomNumber (max) {
  return Math.floor(Math.random() * max) + 0
}

function setDummyData () {
  const { run, bike, swim, sleep, eat } = getMetricMetaInfo()

  let dummyData = {}
  const timestamp = Date.now()

  for (let i = -183; i < 0; i++) {
    const time = timestamp + i * 24 * 60 * 60 * 1000
    const strTime = timeToString(time)
    dummyData[strTime] = getRandomNumber(3) % 2 === 0
      ? {
          run: getRandomNumber(run.max),
          bike: getRandomNumber(bike.max),
          swim: getRandomNumber(swim.max),
          sleep: getRandomNumber(sleep.max),
          eat: getRandomNumber(eat.max),
        }
      : null
  }

  AsyncStorage.setItem(CALENDAR_STORAGE_KEY, JSON.stringify(dummyData))

  return dummyData
}

function setMissingDates (dates) {
  const length = Object.keys(dates).length
  const timestamp = Date.now()

  for (let i = -183; i < 0; i++) {
    const time = timestamp + i * 24 * 60 * 60 * 1000
    const strTime = timeToString(time)

    if (typeof dates[strTime] === 'undefined') {
      dates[strTime] = null
    }
  }

  return dates
}

export function formatCalendarResults (results) {
  return results === null
    ? setDummyData()
    : setMissingDates(JSON.parse(results))
}Task Description:
Let's make sure your project is ready to go!
Task Feedback:
Fantastic work!
Summary
Create React Native App is similar to Create React App in that it scaffolds and builds a starter application with minimal configuration. This allows us to have an app up and running without the need for Xcode or Android Studio! Some of the benefits include:
- Minimal "time to 'Hello World'"
- Development on your own device via Expo
- A single build tool
- No lock-in (i.e., ejection at any time)
You can also set up simulators to aid in development as well. But regardless of which platform we choose to develop for (iOS, Android), and which environment we're in (Mac, Windows, Linux) -- we're just building with the same old JavaScript that we're used to!